Posted on Leave a comment

What is the different between RTX and GTX?

The main differences between RTX and GTX graphics cards from NVIDIA lie in their features and performance:

RTX (Ray Tracing Texel eXtreme):

  • Ray tracing: RTX cards have dedicated RT Cores to handle real-time ray tracing, creating incredibly realistic lighting and shadows in games and other applications.
  • Tensor Cores: These cores accelerate AI functions like deep learning and video editing, making them ideal for creators and professionals.
  • Generally higher performance: RTX cards, especially newer models, tend to outperform GTX cards in terms of frame rates and overall graphical fidelity.
  • Higher price: RTX cards are typically more expensive than GTX cards due to their additional features.

GTX (Giga Texel Shader eXtreme):

  • No ray tracing or Tensor Cores: GTX cards lack dedicated hardware for ray tracing and AI, relying on traditional shaders for these tasks.
  • Lower performance: While good for older games and basic tasks, GTX cards generally fall behind RTX cards in terms of raw performance.
  • Lower price: GTX cards are usually more affordable than RTX cards, making them a good option for budget-conscious gamers.

Here’s a table summarizing the key differences:

FeatureRTXGTX
Ray tracingYesNo
Tensor CoresYesNo
PerformanceGenerally higherLower
PriceHigherLower

Ultimately, the best choice between RTX and GTX depends on your individual needs and budget. If you prioritize the latest features, performance, and want the best possible visual quality, RTX is the way to go. However, if you’re on a tighter budget or primarily play older games, GTX can still be a good option.

Ultimately, the best choice for you depends on your needs and budget:

  • Choose RTX if:
    • You want the best possible graphics with ray tracing.
    • You need the performance boost for demanding games or creative applications.
    • You have the budget to spend on a high-end graphics card.
  • Choose GTX if:
    • You primarily play older games or less demanding titles.
    • You’re on a tight budget.
    • Ray tracing and AI acceleration aren’t priorities for you.

I hope this clarifies the differences between RTX and GTX! Feel free to ask if you have any further questions.

Posted on Leave a comment

The Hongqi L5 is a President Xi Jinping’s car

The Hongqi L5 is a large, retro-styled full-size luxury car produced by Hongqi. The L5 is the official state car of China, and it is used by President Xi Jinping. The sedan is currently offered only in China.

Design

The L5 is styled after the discontinued Hongqi CA770, a limousine that was produced from 1965 to 1980. The L5 has a long wheelbase and a high roofline, which give it a very spacious interior. The car is also adorned with a number of chrome accents, which give it a very opulent appearance.

Engine

The L5 is powered by a 6.0-liter V12 engine that produces 380 horsepower and 440 lb-ft of torque. The engine is mated to a six-speed automatic transmission. The L5 can accelerate from 0 to 60 mph in 8.0 seconds, and it has a top speed of 155 mph.

Interior

The L5 has a very luxurious interior that is trimmed in high-quality leather and wood. The car has a number of features that are designed to make it comfortable for its passengers, including heated and cooled seats, a sunroof, and a rear-seat entertainment system.

Price

The L5 is the most expensive Chinese-made car ever produced. The base price for the L5 is CN„5 million Renminbi (US$800,000 UK£580,000).

Awards

The L5 has won a number of awards, including the “2014 China Car of the Year” award.

Overall

The Hongqi L5 is a very impressive car that is sure to appeal to those who are looking for a luxurious and powerful vehicle.

Posted on Leave a comment

What is MMO?


MMO stands for massively multiplayer online game. It is a type of video game that is played by a large number of players simultaneously on the same server. MMOs typically feature a persistent, open world, which means that the game world continues to exist and evolve even when players are not logged in. This type of game allows players to interact with each other in a variety of ways, such as fighting monsters, completing quests, and trading items.

MMOs are among the most popular types of video games in the world, and they have been around for many years. Some of the earliest MMOs were text-based games, such as MUDs (multi-user dungeons). However, graphical MMOs became popular in the late 1990s, and they have continued to grow in popularity ever since.

Today, there are many different types of MMOs available, including:

  • MMORPGs (massively multiplayer online role-playing games): These are the most popular type of MMO, and they allow players to create their own characters and explore a virtual world. MMORPGs often feature deep gameplay systems, such as character progression, crafting, and PvP (player-versus-player) combat.

Examples of popular MMORPGs include:

  • World of Warcraft
  • Final Fantasy XIV
  • The Elder Scrolls Online
  • Guild Wars 2
  • EVE Online
  • MOFPS (massively multiplayer online first-person shooters): These MMOs are similar to traditional first-person shooters, but they allow a much larger number of players to compete in the same game world. MOFPS often feature large-scale battles and team-based gameplay.

Examples of popular MOFPS include:

  • Battlefield 2042
  • PlanetSide 2
  • Call of Duty: Modern Warfare 2
  • Halo Infinite
  • Apex Legends
  • MMORTS (massively multiplayer online real-time strategy games): These MMOs allow players to control armies and compete against each other in real time. MMORTS often feature complex economic and strategic systems.

Examples of popular MMORTS include:

  • StarCraft II
  • Age of Empires IV
  • Dota 2
  • League of Legends
  • Heroes of the Storm

MMOs can be a great way to socialize with other players and enjoy a shared experience. They can also be very challenging and rewarding, and they can provide endless hours of entertainment.

Posted on Leave a comment

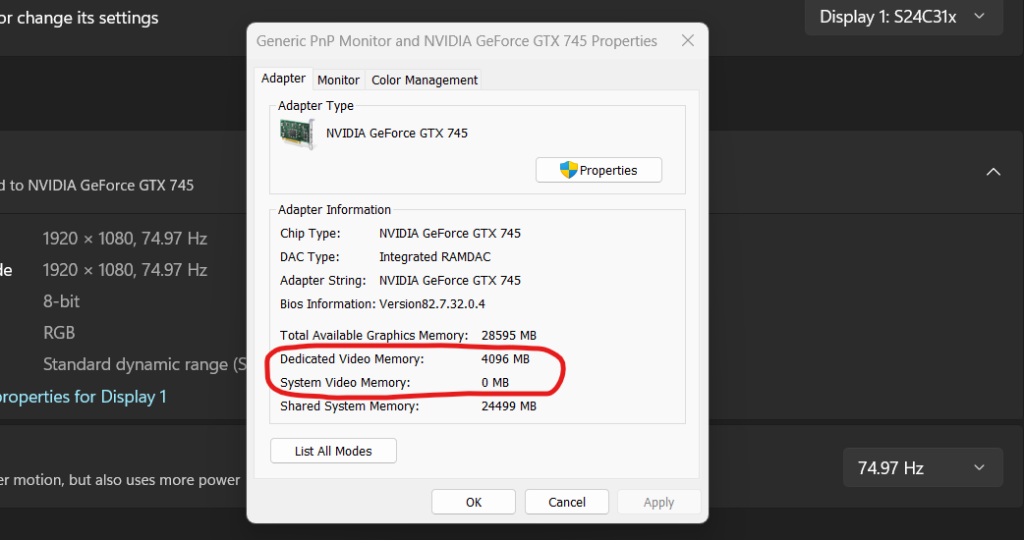
What is System Video Memory?

System video memory, also known as VRAM (video random access memory), is a type of RAM that is specifically designed for storing and processing graphics data. It is located on the graphics card and is separate from the system RAM that is used for other tasks. VRAM is much faster than system RAM, which is why it is essential for tasks that require high-quality graphics, such as gaming and video editing.

VRAM stores a variety of data that is used by the graphics card, including:

  • Textures: Textures are images that are applied to 3D models to give them a realistic appearance.
  • Shader programs: Shader programs are small programs that are used to render graphics effects.
  • Z-buffer: The z-buffer is a data structure that keeps track of the depth of each pixel on the screen. This is used to determine which objects should be drawn in front of others.

The amount of VRAM that a computer needs depends on the type of tasks that it will be used for. For example, a computer that is used for gaming will need more VRAM than a computer that is used for basic tasks such as web browsing and email.

Here are some of the benefits of having more VRAM:

  • Improved graphics performance: More VRAM allows the graphics card to store more textures and shader programs, which can improve the quality of graphics.
  • Reduced stuttering: Stuttering is a common problem in video games, which occurs when the graphics card is not able to render frames fast enough. More VRAM can help to reduce stuttering.
  • Support for higher resolutions: More VRAM allows the graphics card to render images at higher resolutions.

If you are considering upgrading your computer’s video card, then you should make sure that you choose one with a sufficient amount of VRAM. You can find out how much VRAM a particular video card has by checking the manufacturer’s specifications.

Posted on Leave a comment

What is Facebook Right Manager?

Facebook Rights Manager is a tool that helps creators and publishers protect their copyrighted content on Facebook and Instagram. It works by scanning all videos, images, and audio that are uploaded to these platforms for matches to reference files that rights holders have provided. If a match is found, Rights Manager can help rights holders take action, such as blocking the content, monetizing it, or tracking how it is being used.

Rights Manager is a valuable tool for rights holders of all sizes, from individual creators to media publishers and sports leagues. It can help them to:

  • Protect their copyrighted content from unauthorized use
  • Monetize their content by granting permissions to others to use it
  • Track how their content is being used across Facebook and Instagram
  • Identify and address copyright infringement

To be eligible for Rights Manager, rights holders must have a valid copyright registration and a Facebook Business Suite account. Once they have been approved for Rights Manager, they can upload their reference files and start scanning for matches.

Here are some of the key benefits of using Facebook Rights Manager:

  • Proactive protection: Rights Manager can scan for matches to reference files even before content is published, helping to prevent copyright infringement from happening in the first place.
  • Real-time monitoring: Rights Manager can monitor content across Facebook and Instagram in real time, helping rights holders to identify and address copyright infringement quickly.
  • Scalability: Rights Manager can be used to protect a large amount of content at scale, making it a valuable tool for rights holders of all sizes.
  • Flexibility: Rights holders can choose how they want to respond to matches, from blocking the content to monetizing it or tracking how it is being used.

Overall, Facebook Rights Manager is a powerful tool that can help rights holders to protect their copyrighted content and manage it effectively across Facebook and Instagram.

How to apply Facebook Right Manager?

To apply for Facebook Rights Manager, you must first create a Facebook Business Suite account. Once you have created an account, you can submit a request for access to Rights Manager.

To submit a request for access to Rights Manager, follow these steps:

  1. Go to the Rights Manager application form.
  2. Enter your Facebook Business Suite account information.
  3. Select the type of content that you want to protect with Rights Manager.
  4. Provide information about your content, such as the title, description, and copyright information.
  5. Upload reference files for your content.
  6. Review your application and submit it.

Once you have submitted your application, it will be reviewed by Facebook. You will receive an email notification once your application has been approved or denied.

If your application is approved, you will be able to access Rights Manager from your Facebook Business Suite account. To do this, go to Creator Studio > Rights Manager.

Once you are in Rights Manager, you can upload additional reference files, manage your content catalog, and view reports on how your content is being used.

Here are some tips for applying for Facebook Rights Manager:

  • Make sure that you meet the eligibility criteria.
  • Provide clear and accurate information about your content.
  • Upload high-quality reference files.
  • Review your application carefully before submitting it.

If you have any questions about applying for Facebook Rights Manager, you can contact Facebook Support and help.

What are eligibility criteria to apply to Facebook Right Manager?

To be eligible to apply to Facebook Rights Manager, you must meet the following criteria:

  • You must have a valid copyright registration for the content that you want to protect.
  • You must have a Facebook Business Suite account.
  • You must be a page admin or editor for the Facebook Page where you want to use Rights Manager.
  • You must have multiple pieces of original content that you want to protect.
  • You must not have any past copyright infringements or violations on your Facebook Page.

If you meet all of these criteria, you can submit a request for access to Rights Manager.

Here are some additional tips for applying to Facebook Rights Manager:

  • Make sure that your copyright registration is up to date.
  • Provide clear and accurate information about your content in your application.
  • Upload high-quality reference files for your content.
  • Review your application carefully before submitting it.

If you have any questions about applying to Facebook Rights Manager, you can contact Facebook Support.

Posted on Leave a comment

What will happen if the earth stop spinning?


The Earth is 4.54 billion years old.

Scientists have used radiometric dating to determine the age of the Earth by measuring the decay of radioactive isotopes in rocks and meteorites. This method has shown that the oldest rocks on Earth are about 4.03 billion years old, and the oldest moon rocks and meteorites are about 4.5 billion years old. This suggests that the Earth and the other bodies in the solar system formed around the same time.

There are two theories if the planet earth suddently stop spinning

If the Earth stopped spinning, we would experience six months of day and six months of night. The side of the Earth facing the Sun would be extremely hot, while the side facing away would be extremely cold. This would cause massive storms and other extreme weather events. The Earth’s magnetic field would also weaken, making us more vulnerable to harmful radiation. In short, life on Earth would be very difficult, if not impossible.

If the Earth stopped spinning, it would have a catastrophic impact on our planet. We would experience six months of day and six months of night, with extreme temperatures on both sides. The Earth’s magnetic field would also weaken, leaving us vulnerable to harmful radiation from the sun. Additionally, many plants and animals rely on the Earth’s rotation for their survival, so a sudden stop would likely lead to mass extinctions.

Posted on Leave a comment

What is Youtube Right Manager?

YouTube Right Manager is a part of YouTube’s system for managing intellectual property. It consists of three major components:

  1. The YouTube rights management system: This identifies the owners and administrators of your intellectual property and defines the policies used to enforce your rights.
  2. Content ID: This automatically scans YouTube videos for content that matches your intellectual property and applies the defined rights policy to the matching video.
  3. YouTube videos: These are the (optional) public representation of your intellectual property, available to users on youtube.com.

When you upload a piece of intellectual property to YouTube, you need to create a representation of it in each of these components separately. An asset is the representation of your intellectual property in the rights management system. You specify ownership and rights information as part of the asset. A reference is the representation of your intellectual property for Content ID matching. You provide a digital media file that Content ID compares to uploaded video content. A video is the representation of your intellectual property on youtube.com.

You must create an asset for every piece of intellectual property; references and videos are optional. An asset can have more than one reference associated with it. You link videos to assets by claiming the video on behalf of the asset. You claim videos that you upload, and may also claim other users’ videos when they include content that matches your asset.

How to apply for Right Manager on YouTube

To apply for Right Manager on YouTube, you need to follow these steps:

  1. Set up your content owner: When you’ve been approved for Content ID, your YouTube partner manager creates your content owner, which represents you in the YouTube content management system, and grants you access to the Content Manager tools.
  2. Deliver content to YouTube: You add your copyrighted content to the YouTube content management system by delivering reference files (audio, visual, or audiovisual) and metadata that describes the content and which territories you own it in.
  3. Content ID scans user uploads and identifies matches: Content ID continuously compares new uploads to the references for your assets. Matching videos are automatically claimed on behalf of the asset, and your specified match policy is applied to the claimed videos before they are published on YouTube.
  4. Manage and monitor your content: Content Manager includes a To Dos list for actions such as reviewing claims and resolving ownership conflicts. You also have access to analytics, revenue reports, and a full range of content management tools.

Please note that YouTube only grants Content ID to copyright owners who meet specific criteria. To be approved, you must own exclusive rights to a substantial body of original material that is frequently uploaded by the YouTube user community.

If you’re interested in managing your content or related rights on YouTube, you can check out the copyright management tools YouTube offers. If you believe your content has been uploaded without your permission and that infringes your copyright or other related rights, you can submit a copyright takedown request.

If you’d like to explore if it may be possible for you to license your copyright or other related rights directly to YouTube, the simplest way may be to create your own YouTube channel and upload your content yourself. You can find out more and get help as a YouTube Creator.

I hope this helps! Let me know if you have any other questions.

How do I know if my content is eligible for Rights Manager?

To apply for Right Manager on YouTube, you need to meet the following criteria:

  1. Content Eligibility: You must own or control exclusive rights to your video and audio content.
  2. Content Catalog: You should have multiple pieces of original content that you want to protect.
  3. Past Infringements or Violations: You should not post content without permission from the valid copyright owner. Content that you posted in the past should not have been removed in response to a takedown report.

After you request access to Rights Manager, you’ll be contacted via email on whether it is approved, along with further information to get started. If your request cannot be approved when you first apply, you can request access again once you believe you meet the above criteria and after a waiting period. Waiting periods depend on how many times you’ve previously requested access, and are Page-specific:

Please note that you will be able to request access to Rights Manager up to 10 times in 30 days across all Pages for which you have been granted Facebook access or content access.

I hope this helps! Let me know if you have any other questions.

What the difference between Right Manager and Content ID in Youtube?

The YouTube Rights Management system and Content ID are two components of YouTube’s system for managing intellectual property.

YouTube Rights Management System: This system identifies the owners and administrators of your intellectual property and defines the policies used to enforce your rights. When you upload a piece of intellectual property to YouTube, you need to create a representation of it in the YouTube system. An asset is the representation of your intellectual property in the rights management system. You specify ownership and rights information as part of the asset.

Content ID: Content ID is an automated, scalable system that enables copyright owners to identify YouTube videos that include content they own. As the copyright owner, you provide YouTube with a reference copy of your eligible content. YouTube uses the reference to scan uploaded videos for matching content. When a match is found, YouTube applies your preferred policy: to monetize, track, or block the video in question.

In summary, the Rights Management system is where you define your ownership and rights, while Content ID is the tool that enforces those rights by identifying matching content in user-uploaded videos.

Posted on Leave a comment

Very usefull macOs apps that you should not skip

There are numerous useful macOS apps available for a wide range of purposes. Here’s a list of some popular and highly recommended macOS apps across various categories:

Productivity:

  1. Microsoft Office Suite (Word, Excel, PowerPoint, Outlook): Essential for document creation, spreadsheets, presentations, and email management.
  2. Google Chrome or Mozilla Firefox: Web browsers with extensive extensions and syncing capabilities.
  3. Notion: All-in-one workspace for notes, tasks, wikis, and databases.
  4. Todoist: Feature-rich task manager with cross-platform support and collaboration features.
  5. Alfred: Powerful productivity app with system-wide search, hotkeys, and workflow automation.

Creativity and Design:

  1. Adobe Creative Cloud (Photoshop, Illustrator, InDesign, etc.): Industry-standard software for graphic design, photo editing, and more.
  2. Affinity Designer and Affinity Photo: Affordable alternatives to Adobe’s design and photo editing software.
  3. Sketch: Vector graphics editor for UI/UX design and prototyping.
  4. Figma: Collaborative interface design tool with real-time collaboration features.
  5. Canva: Online design tool with templates for social media graphics, posters, and presentations.

Media and Entertainment:

  1. VLC Media Player: Open-source multimedia player that supports a wide range of formats.
  2. iTunes (or Apple Music): For managing your music library, podcasts, and syncing iOS devices.
  3. Plex: Media server software for organizing and streaming your media collection.
  4. Handbrake: Open-source video transcoder for converting video files to various formats.
  5. Audacity: Free, open-source audio editing software for recording and editing audio files.

Utilities:

  1. 1Password or LastPass: Password managers for secure storage and generation of passwords.
  2. CleanMyMac X: Mac cleaning and maintenance tool to optimize performance and free up space.
  3. Dropbox or Google Drive: Cloud storage services for file backup and synchronization.
  4. Amphetamine: Keep your Mac awake for a specific duration to prevent sleep mode.
  5. Bartender: Organize and customize your menu bar icons for a cleaner look.

Communication:

  1. Slack: Team communication and collaboration platform for messaging and file sharing.
  2. Zoom or Microsoft Teams: Video conferencing apps for virtual meetings and webinars.
  3. Spark or Airmail: Feature-rich email clients with advanced features and customizable interfaces.

Development:

  1. Xcode: Integrated development environment for macOS, iOS, watchOS, and tvOS app development.
  2. Visual Studio Code: Lightweight code editor with powerful features and extensive extensions.
  3. Postman: API development and testing tool for building and managing APIs.
  4. Docker: Platform for developing, shipping, and running applications in containers.
  5. Homebrew: Package manager for macOS to install and manage command-line tools and software packages.

Remember that the best app for you depends on your specific needs and preferences, so feel free to explore these options and find the ones that work best for your workflow.

Posted on Leave a comment

How to boot a Mac from USB drive?

Booting a Mac from a USB drive is a straightforward process. Here’s a step-by-step guide to help you do it:

  1. Prepare the USB Drive: First, make sure your USB drive is properly formatted. It needs to be in the macOS Extended (Journaled) or APFS format. You can format the drive using Disk Utility on your Mac.
  2. Create a Bootable USB Drive: You’ll need to create a bootable USB drive with the macOS installer or the operating system you want to install. You can do this using the Terminal application. Here’s how you can create a bootable USB drive for macOS:
    • Download the macOS installer from the Mac App Store.
    • Insert your USB drive into your Mac.
    • Open Terminal (you can find it in the Utilities folder within the Applications folder).
    • Use the createinstallmedia command to create a bootable installer. The basic command looks like this:sudo /Applications/Install\ macOS\ [macOS Name].app/Contents/Resources/createinstallmedia --volume /Volumes/[USB Drive Name] --nointeraction
    • Replace [macOS Name] with the name of your macOS version (for example, “Catalina” or “Big Sur”), and [USB Drive Name] with the name of your USB drive.
    • Press Enter and wait for the process to complete. This may take some time.
  3. Restart Your Mac:
    • Once the bootable USB drive is created, restart your Mac.
  4. Access Startup Manager:
    • As your Mac restarts, hold down the Option key until the Startup Manager appears. This will show you a list of available startup disks.
  5. Select the USB Drive:
    • Use the arrow keys to select the USB drive with the macOS installer on it, then press Enter. Your Mac will boot from the USB drive.
  6. Install or Repair macOS:
    • Follow the on-screen instructions to install macOS or perform other tasks such as disk repair or data recovery.

Remember that the specific steps might vary slightly depending on your macOS version, but the overall process remains similar. If you encounter any issues or need further assistance, feel free to ask!

More about Mac installation

Certainly! Installing macOS on a Mac computer involves a few steps to ensure a smooth installation process. Here’s a detailed overview of macOS installation:

1. System Requirements:

Before you begin, make sure your Mac meets the minimum system requirements for the macOS version you want to install. Apple’s website or the App Store page for the specific macOS version will provide this information.

2. Backup Your Data:

It’s crucial to back up all your important files before performing a macOS installation. You can use Time Machine or manually copy your data to an external drive to ensure you don’t lose any important files during the process.

3. Download macOS Installer:

  • If you’re upgrading to a new macOS version, you can download the installer from the Mac App Store. Once downloaded, the installer will typically launch automatically. If not, you can find it in your Applications folder.

4. Begin Installation:

  • Double-click the macOS installer in the Applications folder to start the installation process.
  • Follow the on-screen instructions. You’ll be asked to agree to the software license agreement and choose the disk where you want to install macOS.

5. Select Installation Disk:

  • If you’re performing a clean installation or upgrading your existing macOS, you’ll need to choose the destination disk. You can install macOS on the Mac’s internal drive or any external drive that meets the system requirements.
  • You can also use Disk Utility during the installation process to format or partition the disk if needed.

6. Installation Progress:

  • Once you’ve selected the installation disk, click “Install” or “Continue” to begin the installation. Your Mac will restart, and the installation progress will be displayed on the screen.
  • The installation process might take some time, depending on the speed of your Mac and the version of macOS you’re installing.

7. Set Up macOS:

  • After the installation is complete, your Mac will restart, and you’ll be guided through the initial setup process. This includes selecting your region, keyboard layout, creating or signing in with your Apple ID, setting up Wi-Fi, and enabling services like Siri and iCloud.

8. Restore Data from Backup:

  • If you created a backup using Time Machine, you’ll have the option to restore your files, apps, and settings during the initial setup or after logging in. Follow the prompts to restore your data from the backup.

9. Software Updates and App Installation:

  • After the macOS installation is complete, it’s a good practice to check for software updates. Go to “System Preferences” > “Software Update” to ensure your system is up-to-date.
  • Reinstall your apps from the Mac App Store or third-party sources. Make sure these apps are compatible with the macOS version you installed.

10. Finalize Settings:

  • Customize your system preferences, desktop wallpaper, screen saver, and other settings according to your preferences.
  • Verify that all your hardware components, such as printers and external devices, are working correctly.

And there you have it! You’ve successfully installed macOS on your Mac computer. If you encounter any issues during the installation process or have specific questions, don’t hesitate to ask for further assistance.

Posted on Leave a comment

What is GDPR and CPRA message in Google Adsense?

A GDPR message in Google AdSense is a banner that displays to users in the European Economic Area (EEA) and the United Kingdom, asking them for consent to use their data to show personalized ads and for other purposes. You can create a GDPR message in your AdSense account by going to Privacy & messaging > GDPR > Create message.

Short answer: A GDPR message in Google AdSense is a banner that asks users for consent to use their data for personalized ads and other purposes.

A CPRA message in Google AdSense is a banner that displays to users in the state of California, asking them for consent to sell or share their personal information. You can create a CPRA message in your AdSense account by going to Privacy & messaging > CPRA > Create message.

The CPRA (California Privacy Rights Act) is a law that gives California residents more control over their personal information. It requires businesses to obtain opt-in consent before selling or sharing personal information.

Short answer: A CPRA message in Google AdSense is a banner that asks users for consent to sell or share their personal information.

Note: The CPRA is similar to the GDPR, but there are some key differences. For example, the CPRA gives California residents the right to opt out of the sale or sharing of their personal information, even if they have previously given consent. The GDPR does not give users this right.

Additionally, the CPRA defines “personal information” more broadly than the GDPR. This means that more types of data are covered by the CPRA, such as device identifiers and IP addresses.